Shell
Usage
Please read #2FA for initial contact.
Simply use SSH to login to this machine:
~# ssh username@shell.stud.informatik.uni-goettingen.de
#######  shell.stud.informatik.uni-goettingen.de - login vm: shell5.cip.loc
...
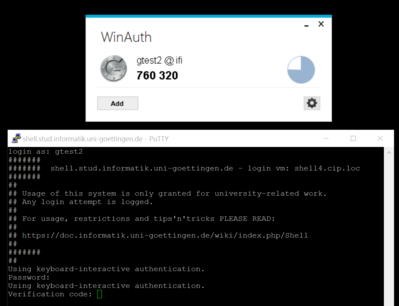
Password:
Verification code:
Welcome to Ubuntu 14.04.4 LTS (GNU/Linux 3.13.0-87-generic x86_64)
username@shell5:~$
For Windows: use PuTTY (simple) or Cygwin (more complex and powerful) or any other SSH-implementation.
Target audience
These machines are meant to be used by students. But of course they can be used by any staff members!
For first time users: the only requirement is to logon one single time using one of the (physical) pool computers in our building - this will make you a "known user" to our systems. Additionally you need to walk through #2FA.
Load Balancing
While this term is misleading on this specific installation as it does simple "round-robin". The important point is that you'll get connected to any login machine. This will be the "next" machine one after another and probably not the same one as one session before. If you landed on an overcrowded system simply disconnect/reconnect to use another machine.
Timeout
- The session Timeout is set to 36 hours -- this is the HAproxy related Timeout regarding the TCP connection
- Kerberos/OpenAFS have separate/shorter timeouts, usually 10 hours. Please check with klist. You need to run kinit && aklog when you're approaching timeout
2FA
Two Factor Authentication
Concept
We use the well known google-authenticator to add a second factor as a requirement for (ssh-) logins. First you will get prompted for your regular password. Then you'll get a second prompt asking for a "Verification code". This code changes every minute, this approach is called TOTP = Time-based One Time Password.
You need to have a compatible generator - usually implemented as a small application. See #Generators
Please note that often this approach is associated with a specific implementation: the Google Authenticator. This is misleading as there are other 100% compatible implementations. See also RFC 6238.
Initialization
Before you can use this technology the first time you need to prepare your personal secret credentials. You do this by using a tool with a surprising name and answering some questions.
Of course you can not do this on these shellX-machines as you can not login successfully (chicken-and-egg problem). Use one of the physical pool computers or login.stud.informatik.uni-goettingen.de instead.
~$ google-authenticator
Do you want authentication tokens to be time-based (y/n) y
... # For full output see Shell/2fa-example
Due to some unusual behaviour of OpenAFS regarding access rights we need to move that file into a different, dedicated subdirectory. This man page explains the access rights mechanism and how to manipulate access-control-lists:
~$ man fs_setacl
First you need to create that directory. A special user with the name ifi-login needs to have read access to the files in that directory. To be able to reach into that directory he needs to "walk through" your home folder. The third line is required to make this possible by granting "l"="list" access rights to your $HOME:
~$ mkdir .ifi-login
~$ fs sa -dir .ifi-login -acl ifi-login read
~$ fs sa -dir . -acl ifi-login l
As usual access rights are inherited. For this reason there are more rights granted than required. You might remove them now by commands like
~$ fs sa -dir .ifi-login -acl mta none
~$ fs sa -dir .ifi-login -acl spamassassin none
~$ fs sa -dir .ifi-login -acl web-home none
You can always check the current settings. At the end it may look like this:
~$ fs la .ifi-login
Access list for .ifi-login is
Normal rights:
 system:administrators rlidwka
 username rlidwka
 username.system rl
 ifi-login rl
WARNING: do not remove rights if you are not absolutely sure they are not needed. It is very easy to remove too many rights, leaving you with a directory that is not usable anymore!
Now move the created credential file into that new destination:
~$ mv .google_authenticator .ifi-login/
Please remember to repeat this step if you modify your configuration!
Usage
From another Linux system it looks like this (shortened):
~$ ssh username@shell4.cip.loc
...
Password:
Verification code:
Welcome to Ubuntu 14.04.4 LTS (GNU/Linux 3.13.0-87-generic x86_64)
...
username@shell4:~$
Generators
 |
The system time is used equivalent to a shared secret! Make sure your clock is set correctly or all generated codes will fail. |
For all generators you need the secret create above. To look into the file use a command like (no, this one is not real :-) ):
~$ head -n1 .ifi-login/.google_authenticator
P2ZOMKQLEIC6SKCL
- Android
- Play Store: "Google Authenticator".
- F-Droid: https://f-droid.org/app/com.google.android.apps.authenticator2
- Linux
- ...
- Ubuntu Touch
- Authenticator
- Windows:
- WinAuth: https://github.com/winauth/winauth -- direct download as of 06.2016: https://winauth.com/downloads/3.x/WinAuth-3.5.1.zip
This is an installation-free application, no setup and no administrative access needed.
- WinAuth: https://github.com/winauth/winauth -- direct download as of 06.2016: https://winauth.com/downloads/3.x/WinAuth-3.5.1.zip
- OS agnostic
- Chromium Browser: GAuth application
- https://5apps.com/gbraad/gauth -- direct use web-application (think twice!) & application for Chrome and Firefox
Tips 'n' Tricks
Connect to a specific machine
Circumventing the Round-Robin mechanism is possible: connect to a specific port 42000+n with n={1..6} :-)
For machine number 4:
~$ ssh -p 42004 username@shell.stud.informatik.uni-goettingen.de
#######
#######  shell.stud.informatik.uni-goettingen.de - login vm: shell4.cip.loc
Todo
- Testing! -- the current state is considered "BETA"
- make Status Information publicly available
- how do scripts handle 2FA?
- require 2FA only from outside the Institute
See also
