DreamSpark und SL:Introduction: Unterschied zwischen den Seiten
imported>Burghardt |
imported>Burghardt |
||
| Zeile 1: | Zeile 1: | ||
| + | The Sensor Lab can be found in room 1.101 of the IfI. |
||
| − | Willkommen auf den DreamSpark- (ehemals MSDNAA) Seiten des Instituts für Informatik.<br> |
||
| − | <br> |
||
| − | Das Softwareportal ist erreichbar via: |
||
| − | * Startseite: https://msdn40.e-academy.com/ifi_inf/ |
||
| − | * Zum Login: http://msdnaa.informatik.uni-goettingen.de/login |
||
| − | Ansprechpartner für Zugangsberechtigungen ist: |
||
| − | * '''[mailto:msdn@informatik.uni-goettingen.de msdn@informatik.uni-goettingen.de]'''<br /> (= [[Benutzer:Burghardt|Udo Burghardt]] & [[Benutzer:Krull|Gunnar Krull]]) |
||
| − | <br> |
||
| + | [[File:SensorLabLogo.png|miniatur|Sensor Lab logo]] |
||
| − | __TOC__ |
||
| − | == Was ist DreamSpark? == |
||
| − | Die MSDN Academic Alliance ist eine spezielle Version des MSDN Universal Abonnements, die Microsoft Schulen, Berufsschulen und Hochschulen anbietet, deren Ausbildungsschwerpunkt im Bereich der Softwareentwicklung liegt. Dieses Lizenzprogramm umfasst die Nutzung der zur Verfügung gestellten Softwaretools nicht nur auf den Laborsystemen der partizipierenden Schule bzw. Hochschule. Die Software kann zusätzlich auch auf den privaten Computern von Lehrern, Hochschulmitarbeitern, Schülern und Studierenden installiert werden, sofern diese ausschließlich für Forschung und Lehre genutzt wird. |
||
| + | == Nodes Hardware == |
||
| − | Das Programm verfolgt dabei zwei primäre Ziele: |
||
| − | * Microsoft-Software – z.B. Entwicklerwerkzeuge, Betriebssysteme und Serverapplikationen – für den Lehrbereich als Know-how-Transfer zur Verfügung stellen |
||
| − | * Allen Studierenden und IT-Auszubildenden den Zugriff auf Microsoft Technologien zu ermöglichen – auch denen, die sie sich vielleicht nicht leisten können. |
||
| + | The sensor nodes we have ordered are from Crossbow technology ([http://web.archive.org/web/20071012145715/http://www.xbow.com/Products/productdetails.aspx?sid=264 http://www.xbow.com/Products/productdetails.aspx?sid=264]) |
||
| − | == Folgende Software ist enthalten: == |
||
| + | Basically, the sensors operate in 2.4GHz ISM band. The range of the radio module is about up to 50 m indoor and up to 300 m outdoor. |
||
| + | For more details see the [[Media:IRIS_Datasheet.pdf|data sheet]]. |
||
| − | * Alle Microsoft Desktop-Betriebssysteme |
||
| − | * Programmiersprachen und Entwicklertools |
||
| + | A number of sensor boards are available, such as the MTS400 board, which includes the following sensors: |
||
| − | Bitte beachten Sie, dass Microsoft Office ''nicht'' im Abonnement enthalten ist! |
||
| + | * Dual-axis Accelerometer: Analog Devices ADXL202JE |
||
| + | * Barometric Pressure Sensor: Intersema MS5534AM |
||
| + | * Ambient Light Sensor: TAOS TSL2550D |
||
| + | * Relative Humidity & Temperature Sensor: Sensirion SHT11 |
||
| + | A [http://user.informatik.uni-goettingen.de/~sensorlab/Hardware full list] of available hardware will be put here soon. |
||
| − | == Wie bekomme ich als Student die Software? == |
||
| − | Wer als Student den Zugang zu MSDNAA-Software haben möchte, muss diese drei Voraussetzungen erfüllen (diese sind von Firma Microsoft vorgegeben!): |
||
| + | == Documents == |
||
| − | # Die rechtlichen Bedingungen gelesen haben und akzeptieren. |
||
| + | === TinyOS === |
||
| − | # Aktuell eingeschriebener Student des Studiengangs "'''Angewandte Informatik''' (Bachelor)" oder "Angewandte Informatik (Master)". |
||
| + | General documents can be found on http://docs.tinyos.net/index.php/Main_Page |
||
| − | # Mindestens eine Prüfung, Praktikum, Seminar, etc. bereits bestanden. |
||
| + | TinyOS Iris API: http://www.tinyos.net/tinyos-2.1.0/doc/nesdoc/iris/ |
||
| − | * Der '''Masterstudiengang''' ist ein neuer, ''eigenständiger'' Studiengang. Es muss erst mindestens ein CP erreicht werden, um einen DreamSpark Account zu erhalten. |
||
| − | * Für Studenten der '''Wirtschaftsinformatik''' wird ein eigenes MSDNAA-Programm der WiInf Abt. II angeboten [http://www.uni-goettingen.de/de/63495.html]. Studenten der Wirtschaftsinformatik bekommen daher am Institut für Informatik keinen Zugang zum MSDNAA. |
||
| + | === How To === |
||
| − | '''Immatrikulationsbescheinigung'''<br /> |
||
| + | [[Media:20100107_How_to_disassemble_a_sensor_node_to_reprogramme_it.pdf|How To Disassemble a Sensor Node to Reprogram it (.pdf)]] [[Media:20100107_How_to_disassemble_a_sensor_node_to_reprogramme_it.doc|(.doc)]] |
||
| − | Im Rahmen der Selbstbedienungsfunktionen kann man eine aktuelle Bescheinigung ''verifizierbar'' als .pdf exportieren. '''Diese Art des Nachweises wird bevorzugt.''' |
||
| + | === Modifications for iris motes === |
||
| + | ==== PacketParrot application ==== |
||
| + | The PacketParrot application which is provided with TinyOS does not work on directly on the Iris motes. Thus, the following modified version can be used instead. The modifications are basically replacing the special radio component, which is used for sending and receiving, by the generic AMSenderC and AMReceiverC components. |
||
| + | [[Media:PacketParrotC.nc| PacketParrotC.nc]] |
||
| − | '''Voraussetzungen erfüllt und FlexNow.pdf erstellt?'''<br /> |
||
| − | Dann eine Email - '''bitte mit der user@stud.uni-goettingen.de Adresse als Absender!''' - erstellen, .pdf anhängen und losschicken. Der Account wird so schnell wie möglich erstellt, in unserer Antwort ist der nächste Schritt beschrieben. |
||
| + | [[Media:PacketParrotP.nc| PacketParrotP.nc]] |
||
| − | ''Falls keine Uni-Emailadresse als Absender angegeben wird, ist eine plausible Begründung notwendig!'' |
||
| + | == Installation == |
||
| − | '''Auslieferung:'''<br /> |
||
| + | === Debian === |
||
| − | Die MSDNAA-Software wird grundsätzlich '''nur online''' verteilt und freigegeben. |
||
| + | [[SL:Install TinyOS 2.1 in Debian (lenny)]] |
||
| − | Das MSDNAA-Verwaltungssystem funktioniert nur korrekt mit dem Internet Explorer. FireFox und andere Browser können beim Dateidownload Probleme haben! |
||
| − | == |
+ | === Ubuntu === |
| + | The PCs in the sensor lab room are currently running Ubuntu 10.04. |
||
| − | '''Alle Accounts werden regelmäßig nach Ende des Sommersemesters deaktiviert''' und erst nach Anforderung '''und mit aktuellen Berechtigungsnachweisen''' wieder freigeschaltet. |
||
| + | ==== TOSSIM ==== |
||
| − | Diese jährliche Deaktivierung ist notwendig, da nur eingeschriebene Studenten Zugang erhalten dürfen (siehe MSDNAA-EULA). Da uns aus Datenschutzgründen der aktuelle Immatrikulationsstatus vom Studentensekretariat nicht mitgeteilt werden darf, müssen wir jährlich eine neue I-Bescheinigung einfordern. |
||
| + | TOSSIM version in Tinyos 2.1.1 requires Python 2.5.5, which is not available in Ubuntu 10.04 (only newer versions are available). The following has been used successfully to install a compatible Python version: |
||
| + | <nowiki>sudo apt-get install build-essential gcc |
||
| + | cd Downloads |
||
| + | wget http://www.python.org/ftp/python/2.5.5/Python-2.5.5.tgz |
||
| + | tar -xvzf Python-2.5.5.tgz |
||
| + | cd Python-2.5.5 |
||
| + | ./configure --prefix=/usr/local/python2.5 |
||
| + | make |
||
| + | make test |
||
| + | sudo make install |
||
| + | sudo ln -s /usr/local/python2.5/bin/python /usr/bin/python2.5 |
||
| + | sudo ln -s /usr/local/python2.5/bin/python-config /usr/bin/python2.5-config</nowiki> |
||
| + | == VMWare == |
||
| + | login to the set up computer |
||
| + | user: wsn |
||
| + | password: tinyos |
||
| + | start Xubuntos in VMWare-Player |
||
| − | [[Kategorie:Software]] |
||
| + | user: xubuntos |
||
| + | password: tinyos |
||
| + | |||
| + | == Test == |
||
| + | Note: the motelist command does not show any connected motes (I think it is because of that the hardware is very new and therefore cannot be recognised) |
||
| + | |||
| + | To find out which usb device to use, just connect the node and use the ''dmesg'' command. |
||
| + | |||
| + | Transfer test application Blink to the node attached via USB |
||
| + | cd /opt/tinyos-2.1.0/apps/Blink |
||
| + | make iris install.1 mib520,/dev/ttyUSB0 |
||
| + | |||
| + | [[File:Tinyos_first_test.JPG]] |
||
| + | |||
| + | |||
| + | == Manuals (CD KIT) == |
||
| + | |||
| + | [[File:SensorKit.jpg|600px|left|Sensor Kit]] |
||
| + | |||
| + | |||
| + | |||
| + | ==== CD Documents and Manuals ==== |
||
| + | |||
| + | |||
| + | [[Media:MEP_SYS_Users_Manual_7430-0411-02_A.pdf]] |
||
| + | |||
| + | [[Media:MoteConfig_Users_Manual_7430-0112-01_A.pdf]] |
||
| + | |||
| + | [[Media:MoteView_Users_Manual_7430-0008-05_A.pdf]] |
||
| + | |||
| + | [[Media:MoteWorks_Getting_Started_Guide_7430-0102-01_D.pdf]] |
||
| + | |||
| + | [[Media:MPR-MIB_Series_Users_Manual_7430-0021-08_A.pdf]] |
||
| + | |||
| + | [[Media:MTS-MDA_Series_Users_Manual_7430-0020-05_A.pdf]] |
||
| + | |||
| + | [[Media:TinyOS-nesC_Reference_Manual.pdf]] |
||
| + | |||
| + | [[Media:WSN_Quick_Start_Guide.pdf]] |
||
| + | |||
| + | [[Media:XMesh_Users_Manual_7430-0108-01_C.pdf]] |
||
| + | |||
| + | [[Media:XServe_Users_Manual_7430-0111-01_D.pdf]] |
||
| + | |||
| + | |||
| + | |||
| + | |||
| + | |||
| + | |||
| + | == See also == |
||
| + | * [[SL:tmg94]] -- ESXi Server for hosting Virtual Machines |
||
| + | * [[SL:PC3]] -- local Windows XP |
||
| + | * [[SL:Virtual Machines]] |
||
| + | * [[SL:Remote Access]] -- reach in from the outside world |
||
| + | * [[SL:Topology]] -- the network address ranges, machine names... |
||
| + | * [[SL:Network_Users]] |
||
| + | * [[SL:Power Switches]] |
||
| + | |||
| + | [[Category:Sensorlab]] |
||
Version vom 31. Oktober 2012, 09:49 Uhr
The Sensor Lab can be found in room 1.101 of the IfI.
Nodes Hardware
The sensor nodes we have ordered are from Crossbow technology (http://www.xbow.com/Products/productdetails.aspx?sid=264) Basically, the sensors operate in 2.4GHz ISM band. The range of the radio module is about up to 50 m indoor and up to 300 m outdoor.
For more details see the data sheet.
A number of sensor boards are available, such as the MTS400 board, which includes the following sensors:
- Dual-axis Accelerometer: Analog Devices ADXL202JE
- Barometric Pressure Sensor: Intersema MS5534AM
- Ambient Light Sensor: TAOS TSL2550D
- Relative Humidity & Temperature Sensor: Sensirion SHT11
A full list of available hardware will be put here soon.
Documents
TinyOS
General documents can be found on http://docs.tinyos.net/index.php/Main_Page
TinyOS Iris API: http://www.tinyos.net/tinyos-2.1.0/doc/nesdoc/iris/
How To
How To Disassemble a Sensor Node to Reprogram it (.pdf) (.doc)
Modifications for iris motes
PacketParrot application
The PacketParrot application which is provided with TinyOS does not work on directly on the Iris motes. Thus, the following modified version can be used instead. The modifications are basically replacing the special radio component, which is used for sending and receiving, by the generic AMSenderC and AMReceiverC components.
Installation
Debian
SL:Install TinyOS 2.1 in Debian (lenny)
Ubuntu
The PCs in the sensor lab room are currently running Ubuntu 10.04.
TOSSIM
TOSSIM version in Tinyos 2.1.1 requires Python 2.5.5, which is not available in Ubuntu 10.04 (only newer versions are available). The following has been used successfully to install a compatible Python version:
sudo apt-get install build-essential gcc
cd Downloads
wget http://www.python.org/ftp/python/2.5.5/Python-2.5.5.tgz
tar -xvzf Python-2.5.5.tgz
cd Python-2.5.5
./configure --prefix=/usr/local/python2.5
make
make test
sudo make install
sudo ln -s /usr/local/python2.5/bin/python /usr/bin/python2.5
sudo ln -s /usr/local/python2.5/bin/python-config /usr/bin/python2.5-config
VMWare
login to the set up computer
 user: wsn
 password: tinyos
start Xubuntos in VMWare-Player
 user: xubuntos
 password: tinyos
Test
Note: the motelist command does not show any connected motes (I think it is because of that the hardware is very new and therefore cannot be recognised)
To find out which usb device to use, just connect the node and use the dmesg command.
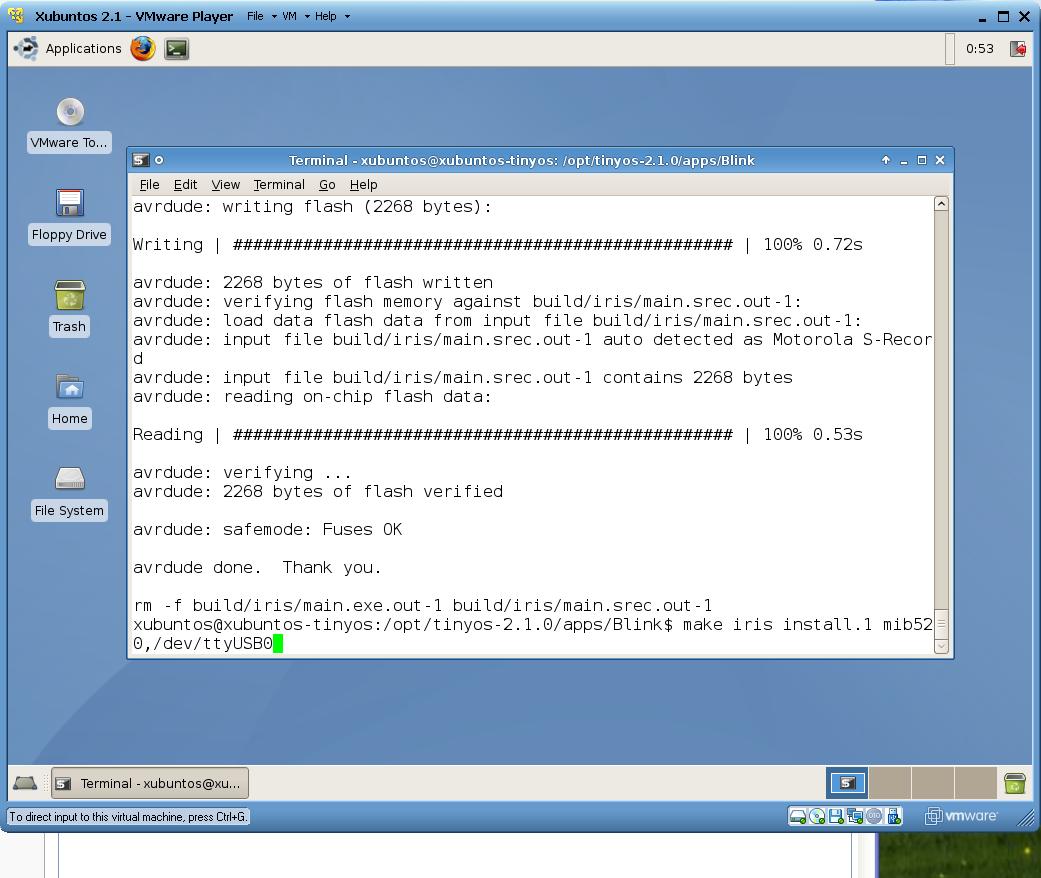
Transfer test application Blink to the node attached via USB
 cd /opt/tinyos-2.1.0/apps/Blink
 make iris install.1 mib520,/dev/ttyUSB0
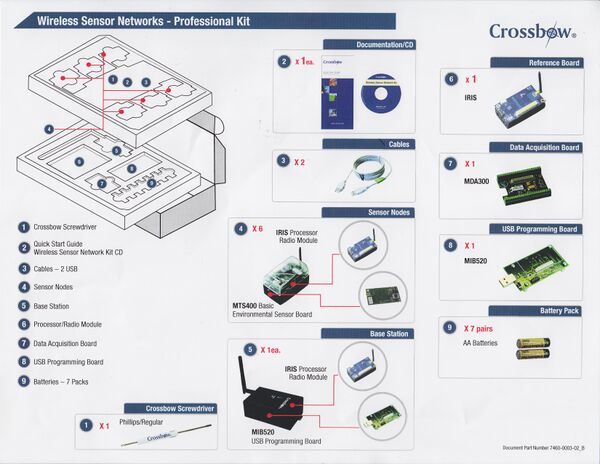
Manuals (CD KIT)
CD Documents and Manuals
Media:MEP_SYS_Users_Manual_7430-0411-02_A.pdf
Media:MoteConfig_Users_Manual_7430-0112-01_A.pdf
Media:MoteView_Users_Manual_7430-0008-05_A.pdf
Media:MoteWorks_Getting_Started_Guide_7430-0102-01_D.pdf
Media:MPR-MIB_Series_Users_Manual_7430-0021-08_A.pdf
Media:MTS-MDA_Series_Users_Manual_7430-0020-05_A.pdf
Media:TinyOS-nesC_Reference_Manual.pdf
Media:WSN_Quick_Start_Guide.pdf
Media:XMesh_Users_Manual_7430-0108-01_C.pdf
Media:XServe_Users_Manual_7430-0111-01_D.pdf
See also
- SL:tmg94 -- ESXi Server for hosting Virtual Machines
- SL:PC3 -- local Windows XP
- SL:Virtual Machines
- SL:Remote Access -- reach in from the outside world
- SL:Topology -- the network address ranges, machine names...
- SL:Network_Users
- SL:Power Switches


