SL:Introduction: Unterschied zwischen den Versionen
imported>Arne.bochem |
imported>Arne.bochem |
||
| Zeile 48: | Zeile 48: | ||
A full list of available hardware is also available on the [http://user.informatik.uni-goettingen.de/~sensorlab/Hardware Sensor Lab website]. More detailed [[Media:MTS-MDA_Series_Users_Manual_7430-0020-05_A.pdf|information]] is also available. |
A full list of available hardware is also available on the [http://user.informatik.uni-goettingen.de/~sensorlab/Hardware Sensor Lab website]. More detailed [[Media:MTS-MDA_Series_Users_Manual_7430-0020-05_A.pdf|information]] is also available. |
||
| + | |||
| + | === New motes === |
||
| + | A new set of motes and sensors are also available: [[SL:CM motes]] |
||
=== Batteries === |
=== Batteries === |
||
Version vom 3. Dezember 2012, 18:32 Uhr
Location
The Sensor Lab is located on the Telematics Group floor, room 1.101 at the IfI. The door is locked by a card reader (Ci-port with profile 0418). Please contact the supervisor of your course to get access to the lab.
Nodes Hardware
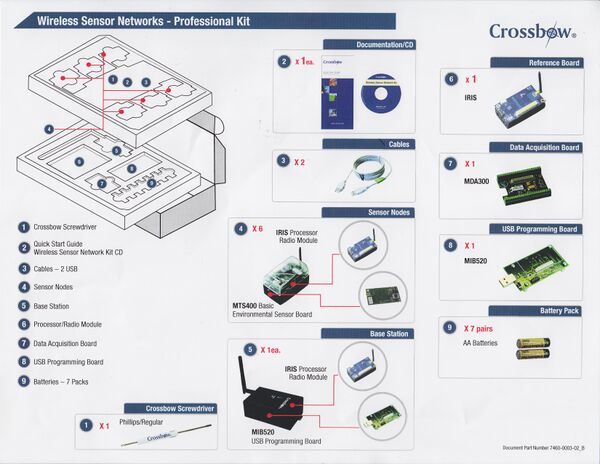
The sensor nodes we have ordered are from Crossbow technology (http://www.xbow.com/Products/productdetails.aspx?sid=264) Basically, the sensors operate in 2.4GHz ISM band. The range of the radio module is about up to 50 m indoor and up to 300 m outdoor.
For more details see the data sheet.
MIB520 USB Gateway boards are available for programming sensor motes, using them with USB power, and debugging or base station uses.
Sensor boards
A number of sensor boards are available.
MDA100CB
A number of MDA100CB sensor boards are available. The include the following features:
- Light sensor: CdSe photo cell
- Temperature sensor: YSI 44006 thermistor
- Prototyping area: For connecting further sensors and devices
MDA300CA
The MDA300CA is a sensor board and general measurement platform. It allows for low-power wireless instrumentation and can be used and extended to be used in various areas.
MTS310CB
The MTS310CB sensor board includes the following components:
- Microphone
- Sounder: 4kHz fixed frequency piezoelectric resonator
- Light sensor: CdSe photo cell
- Temperature sensor: Panasonic ERT-J1VR103J thermistor
- 2-Axis Accelerometer: Analog Devices ADXL202JE
- Two-Axis Magnetometer: Honeywell HMC1002
In addition to the sensors, it also has a sounder, which can be used as an alert, or possibly for audio communication between motes.
MTS400
The MTS400CC board, which includes the following sensors:
- Dual-axis Accelerometer: Analog Devices ADXL202JE
- Barometric Pressure Sensor: Intersema MS5534AM
- Ambient Light Sensor: TAOS TSL2550D
- Relative Humidity & Temperature Sensor: Sensirion SHT11
Additionally, a few MTS420CC boards are available, which are basically the same, but include an additional ublox LEA-4A GPS module. Getting this to work with IRIS motes is still a work in progress, however.
A full list of available hardware is also available on the Sensor Lab website. More detailed information is also available.
New motes
A new set of motes and sensors are also available: SL:CM motes
Batteries
We have a number of non-rechargeable batteries, as well as rechargeable AccuCell batteries. Please avoid deep discharges on the AccuCell batteries, as well as unnecessary recharges, as it can significantly lower their lifespan. A map has been placed underneath the transparent battery box, to help identify compartments for freshly charged and used batteries to make management easier.
Documents
TinyOS
General documents can be found on http://docs.tinyos.net/index.php/Main_Page
TinyOS Iris API: http://www.tinyos.net/tinyos-2.1.0/doc/nesdoc/iris/
How To
How To Disassemble a Sensor Node to Reprogram it (.pdf) (.doc)
Printing
There is a printer in the Sensor Lab, in case you require printed documentation. To use it, please start the ws1 PC, which acts as a print server for the lab. It should be reachable from ws1-6 and pc01.
Modifications for IRIS motes
PacketParrot application
The PacketParrot application which is provided with TinyOS does not work on directly on the Iris motes. Thus, the following modified version can be used instead. The modifications are basically replacing the special radio component, which is used for sending and receiving, by the generic AMSenderC and AMReceiverC components.
Motelist
To make the motelist command work with IRIS motes, a change has to be made to the motelist script. The following patch has to be applied:
--- motelist	2012-11-12 15:23:43.405203257 +0100
+++ motelist.fixed	2012-11-12 15:24:13.326732983 +0100
@@ -62,6 +62,7 @@
   #  Scan /sys/bus/usb/drivers/usb for FTDI or CP210X devices
   my @ftdidevs =
     grep { (($_->{UsbVendor}||"") eq "0403" && ($_->{UsbProduct}||"") eq "6001")
+       || (($_->{UsbVendor}||"") eq "0403" && ($_->{UsbProduct}||"") eq "6010")
        || (($_->{UsbVendor}||"") eq "10c4" && ($_->{UsbProduct}||"") eq "ea60")}
     map { {
       SysPath => $_,
Installation
Debian
SL:Install TinyOS 2.1 in Debian (lenny)
Ubuntu
The PCs in the sensor lab room are currently running Ubuntu 10.04.
TOSSIM
TOSSIM version in Tinyos 2.1.1 requires Python 2.5.5, which is not available in Ubuntu 10.04 (only newer versions are available). The following has been used successfully to install a compatible Python version:
sudo apt-get install build-essential gcc
cd Downloads
wget http://www.python.org/ftp/python/2.5.5/Python-2.5.5.tgz
tar -xvzf Python-2.5.5.tgz
cd Python-2.5.5
./configure --prefix=/usr/local/python2.5
make
make test
sudo make install
sudo ln -s /usr/local/python2.5/bin/python /usr/bin/python2.5
sudo ln -s /usr/local/python2.5/bin/python-config /usr/bin/python2.5-config
VMWare
login to the set up computer
 user: wsn
 password: tinyos
start Xubuntos in VMWare-Player
 user: xubuntos
 password: tinyos
Test
Note: the motelist command does not show any connected motes (I think it is because of that the hardware is very new and therefore cannot be recognised)
To find out which usb device to use, just connect the node and use the dmesg command.
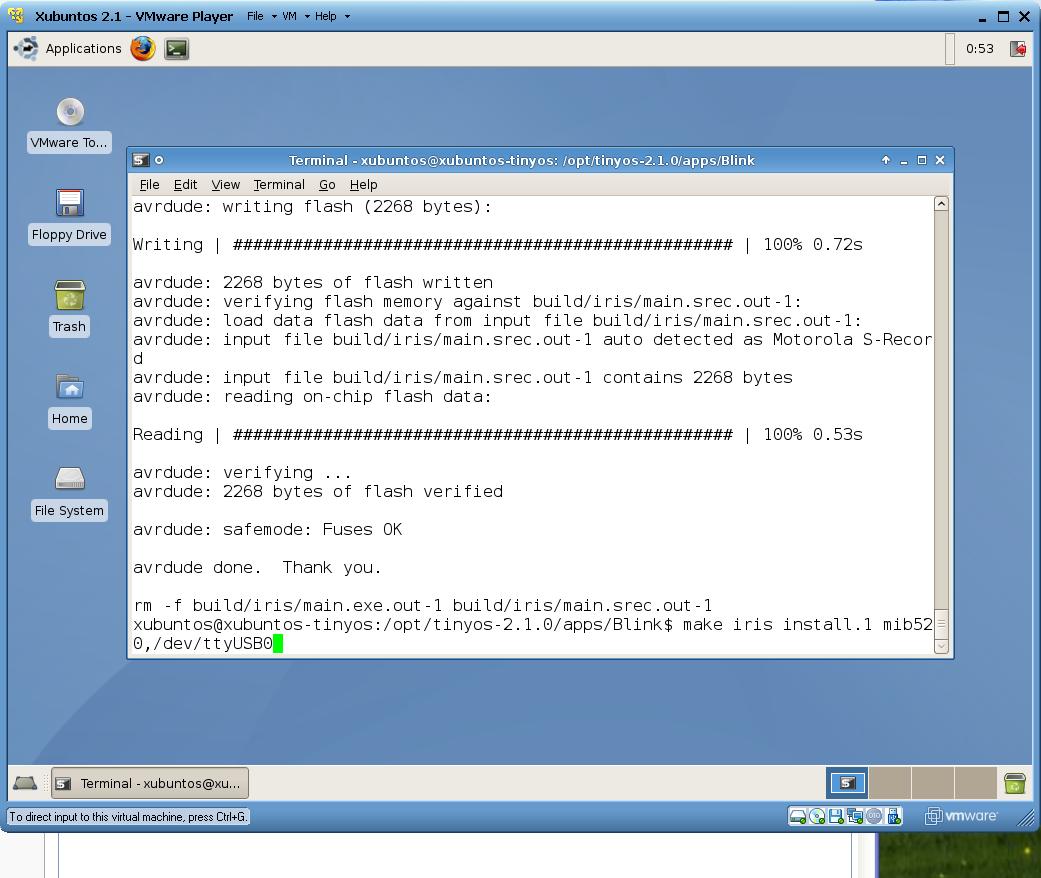
Transfer test application Blink to the node attached via USB
 cd /opt/tinyos-2.1.0/apps/Blink
 make iris install.1 mib520,/dev/ttyUSB0
Manuals (CD KIT)
CD Documents and Manuals
Media:MEP_SYS_Users_Manual_7430-0411-02_A.pdf
Media:MoteConfig_Users_Manual_7430-0112-01_A.pdf
Media:MoteView_Users_Manual_7430-0008-05_A.pdf
Media:MoteWorks_Getting_Started_Guide_7430-0102-01_D.pdf
Media:MPR-MIB_Series_Users_Manual_7430-0021-08_A.pdf
Media:MTS-MDA_Series_Users_Manual_7430-0020-05_A.pdf
Media:TinyOS-nesC_Reference_Manual.pdf
Media:WSN_Quick_Start_Guide.pdf
Media:XMesh_Users_Manual_7430-0108-01_C.pdf
Media:XServe_Users_Manual_7430-0111-01_D.pdf
See also
- SL:tmg94 -- ESXi Server for hosting Virtual Machines
- SL:PC3 -- local Windows XP
- SL:Virtual Machines
- SL:Remote Access -- reach in from the outside world
- SL:Topology -- the network address ranges, machine names...
- SL:Network_Users
- SL:Power Switches
- SL:CM motes


